
[GDSC] Spring Boot로 REST API 만들어보기
GDSC 서버 파트의 스터디를 위한 자료
velog.io
위 글을 참고해서 작성했다.
프로젝트 생성
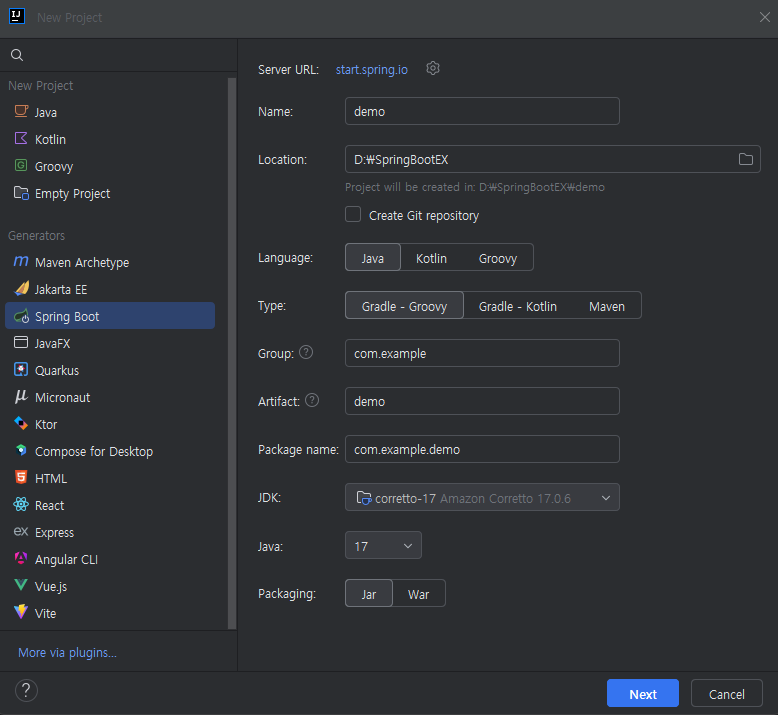
Group에는 회사 도메인 이름을 역순으로 작성한다.
다 작성했으면 Next를 누른다.

Lombok, Spring Web, Spring Web Services를 체크하고 Create를 누른다.
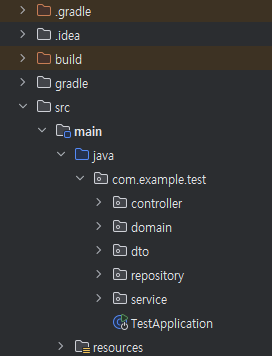
프로젝트 이름을 test로 했기 때문에 TestApplication이 생긴 것을 확인할 수 있다.
위 사진과 폴더 구조가 동일해지도록 com.example.test 우클릭하여 controller, domain, dto, repository, service 패키지를 생성한다.
API 구현
domain
DB에 저장될 아이템의 클래스를 정의한다.
Item.java
Setter 대신 Builder를 사용했다.
package com.example.test.domain;

import lombok.Builder;
import lombok.Getter;

@Getter
public class Item {
    private Long id;
    private String name;
    private Long count;

    @Builder
    public Item(String name, Long count) {
        this.name = name;
        this.count = count;
    }

    public void initId(Long id) {
        this.id = id;
    }

    public void updateItem(String name, Long count) {
        this.name = name;
        this.count = count;
    }
}
dto
데이터를 주고 받을 때 사용하는 클래스들을 모아두는 폴더이다.
요청 dto와 응답 dto를 나누기도 한다.
ItemDto.java
package com.example.test.dto;

import lombok.Builder;
import lombok.Data;

@Data
public class ItemDto {
    private Long id;
    private String name;
    private Long count;

    @Builder
    public ItemDto(Long id, String name, Long count) {
        this.id = id;
        this.name = name;
        this.count = count;
    }
}
Repository
DB와 연관되어 있는 계층이다.
ItemRepository.java
Repository 구현체가 가져야 할 메소드들을 인터페이스로 정의한다.
package com.example.test.repository;

import com.example.test.domain.Item;

import java.util.List;

public interface ItemRepository {
    void save(Item item);
    Item findById(Long id);
    List<Item> findAll();
    void updateById(Long id, Item item);
    void deleteById(Long id);
}MemoryItemRepository.java
위에서 만든 인터페이스에 있든 모든 추상 메서드들을 구현한다.
여기서는 DB 대신 Map을 사용한다.
package com.example.test.repository;

import com.example.test.domain.Item;
import org.springframework.stereotype.Repository;

import java.util.HashMap;
import java.util.List;
import java.util.Map;

@Repository
public class MemoryItemRepository implements ItemRepository{
    private static Map<Long, Item> store = new HashMap<>();
    private static Long sequence = 0L;

    @Override
    public void save(Item item) {
        item.initId(++sequence);
        store.put(item.getId(), item);I
    }

    @Override
    public Item findById(Long id) {
        return store.get(id);
    }

    @Override
    public List<Item> findAll() {
        return store.values().stream().toList();
    }

    @Override
    public void updateById(Long id, Item item) {
        store.put(id, item);
    }

    @Override
    public void deleteById(Long id) {
        store.remove(id);
    }
}
Service
실제 서비스 로직을 구현한다. 컨트롤러에서 이 함수들을 호출하게 된다.
package com.example.test.service;

import com.example.test.domain.Item;
import com.example.test.dto.ItemDto;
import com.example.test.repository.ItemRepository;
import org.springframework.stereotype.Service;

import java.util.List;

@Service
public class ItemService {
    private final ItemRepository itemRepository;

    public ItemService(ItemRepository itemRepository) {
        this.itemRepository = itemRepository;
    }

    public void saveItem(ItemDto itemDto) {
        Item item = Item.builder()
                .name(itemDto.getName())
                .count(itemDto.getCount())
                .build();

        itemRepository.save(item);
    }

    public ItemDto findItemById(Long id) {
        Item item = itemRepository.findById(id);

        return ItemDto.builder()
                .id(item.getId())
                .name(item.getName())
                .count(item.getCount())
                .build();
    }

    public List<ItemDto> findAllItem() {
        return itemRepository.findAll()
                .stream()
                .map(item -> ItemDto.builder()
                        .id(item.getId())
                        .name(item.getName())
                        .count(item.getCount())
                        .build())
                .toList();
    }

    public void updateItemById(Long id, ItemDto itemDto) {
        Item findItem = itemRepository.findById(id);
        findItem.updateItem(itemDto.getName(), itemDto.getCount());

        itemRepository.updateById(id, findItem);
    }

    public void deleteItemById(Long id) {
        itemRepository.deleteById(id);
    }
}
Controller
특정 URI로 오는 요청을 처리해서 응답을 보내주는 역할을 한다.
ItemController.java
요청의 body에 있는 내용은 @RequestBody 어노테이션을 사용하고, URI에 있는 변수는 @PathVariable 어노테이션으로 가져온다.
package com.example.test.controller;

import com.example.test.dto.ItemDto;
import com.example.test.service.ItemService;
import org.springframework.web.bind.annotation.*;

import java.util.List;

@RestController
public class ItemController {
    private final ItemService itemService;

    public ItemController(ItemService itemService) {
        this.itemService = itemService;
    }

    @PostMapping("items")
    public void save(@RequestBody ItemDto itemDto) {
        itemService.saveItem(itemDto);
    }

    @GetMapping("items/{id}")
    public ItemDto findItemById(@PathVariable Long id) {
        return itemService.findItemById(id);
    }

    @GetMapping("items")
    public List<ItemDto> findAllItem() {
        return itemService.findAllItem();
    }

    @PutMapping("items/{id}")
    public void updateItemById(@PathVariable Long id, @RequestBody ItemDto itemDto) {
        itemService.updateItemById(id, itemDto);
    }

    @DeleteMapping("items/{id}")
    public void deleteItemById(@PathVariable Long id) {
        itemService.deleteItemById(id);
    }
}
Lombok
프로젝트 생성할 때 lombok 클릭을 안해서 직접 추가해줬었다.
implementation 'org.projectlombok:lombok' 만 적으니까 symbol: method builder() 에러 나길래 아래 두 줄도 추가해줬다.
다 작성했으면 오른쪽 상단에 코끼리 모양 아이콘을 눌러준다. (gradle 기준)
dependencies {
    // ...

    implementation 'org.projectlombok:lombok'
    annotationProcessor('org.projectlombok:lombok')
    testAnnotationProcessor('org.projectlombok:lombok')
}
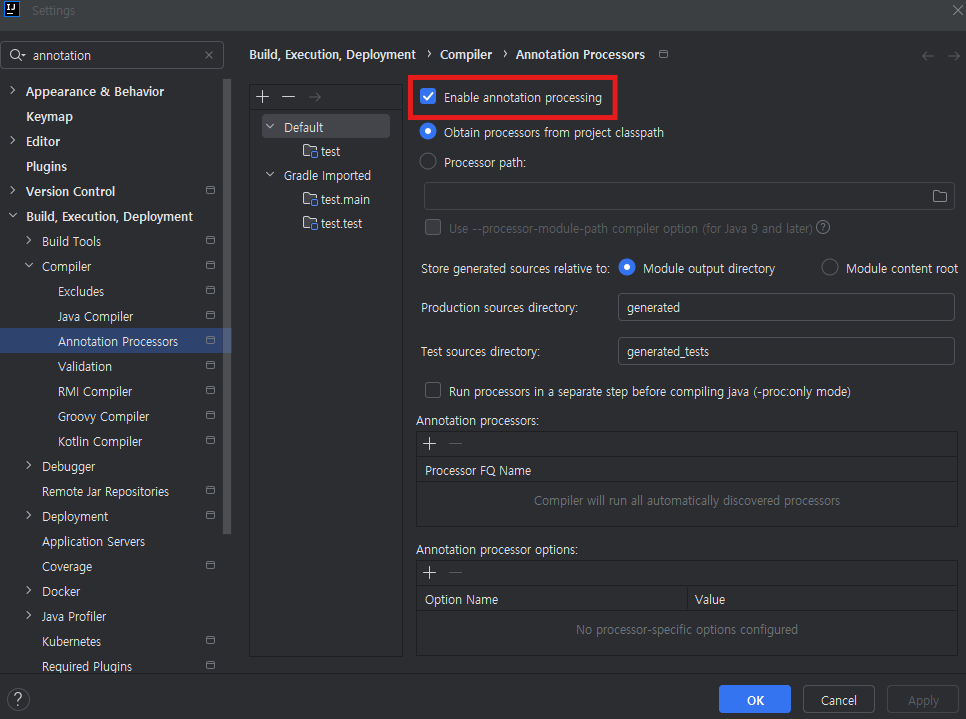
그리고 Settings에 들어가서 Annotation Processors의 Enable annotaion processing을 체크하면 이제 정상적으로 동작한다.
예외 처리
exception 패키지를 만들어준다.
CustomException.java
예외 클래스를 정의한다.
package com.example.test.exception;

import lombok.Getter;
import org.springframework.http.HttpStatus;

@Getter
public class CustomException extends RuntimeException{
    private String message;
    private HttpStatus errorCode;
    private String hint;

    protected CustomException() {
    }

    public CustomException(String message, HttpStatus errorCode, String hint) {
        this.message = message;
        this.errorCode = errorCode;
        this.hint = hint;
    }
}CustomExceptionModel.java
예외 객체의 모델을 정의한다.
record를 사용하여 불변 객체를 생성한다.
package com.example.test.exception;

import org.springframework.http.HttpStatus;

public record CustomExceptionModel (
    String message,
    HttpStatus errorCode,
    String hint
) {}CustomExceptionInterceptor.java
@ControllerAdvice 어노테이션을 사용하고, CustomExceptionInterceptor가 ReponseEntityExceptionHandler를 상속받아서 던져지는 예외를 받아낼 수 있도록 한다.
package com.example.test.exception;

import org.springframework.http.HttpStatus;
import org.springframework.http.ResponseEntity;
import org.springframework.web.bind.annotation.ControllerAdvice;
import org.springframework.web.bind.annotation.ExceptionHandler;
import org.springframework.web.servlet.mvc.method.annotation.ResponseEntityExceptionHandler;

@ControllerAdvice
public class CustomExceptionInterceptor extends ResponseEntityExceptionHandler {

    @ExceptionHandler(CustomException.class)
    public final ResponseEntity<Object> handleCustomException(CustomException err) {
        CustomExceptionModel exceptionResponse = new CustomExceptionModel(
                err.getMessage(),
                err.getErrorCode(),
                err.getHint()
        );

        return new ResponseEntity(exceptionResponse, err.getErrorCode());
    }
}
ItemService.java
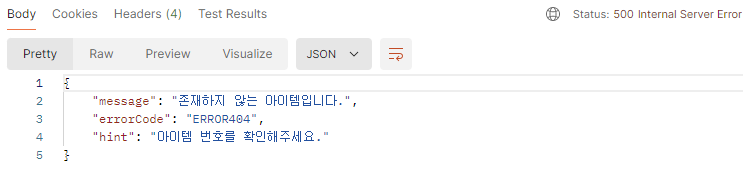
존재하지 않는 아이템에 대한 조회 요청이 들어오면 예외를 던진다.
public ItemDto findItemById(Long id) {
    Item item = itemRepository.findById(id);

    if(item == null) {
        throw new CustomException(
            "존재하지 않는 아이템입니다.",
            HttpStatus.NOT_FOUND,
            "아이템 번호를 확인해주세요."
        );
    }

    return ItemDto.builder()
            .id(item.getId())
            .name(item.getName())
            .count(item.getCount())
            .build();
}
'웹 프로그래밍' 카테고리의 다른 글
| [Spring Boot] Licruit - 회원가입(2) (0) | 2024.09.11 |
|---|---|
| [Spring Boot] Licruit - 회원가입 (0) | 2024.09.10 |
| [React] 프로젝트 관리 앱 (1) | 2024.01.26 |
| [React] Investment Calculator (0) | 2024.01.08 |
| [YelpCamp 프로젝트] 보안 (0) | 2023.12.11 |